Showing posts with label Polkadoodles. Show all posts

Sunday, 26 June 2022

Wk 7 - Craft, Card making & Scrapbooking mixed media challenge - Anything Goes

Welcome back to another challenge!
As always, the theme this month is 
Anything Mixed Media Goes
You do not need to use Polkadoodles products to enter our challenges, use any products you wish... 
RANDOM WINNER PRIZE:  $10 GIFT VOUCHER for the Polkadoodles store
for our lucky winner, (chosen by random.org) - this voucher can be spent across the whole store, so you can use it on dies, stamps, papers, digis, whatever you wish...
Winners of our last challenge are at the bottom of this post...

Our sponsor for 2022 is Polkadoodles and you can check out all the wonderful selection of Polkadoodles goodies in the shop

Make sure you check out the POLKADOODLES store here!  

Let's see what the team have made for you this month!... We are excited to have some new team members sharing their amazing work with you today, so a big welcome to PaulSoniaAriadna & Claire P - make sure your follow their social media for lots of inspiration!

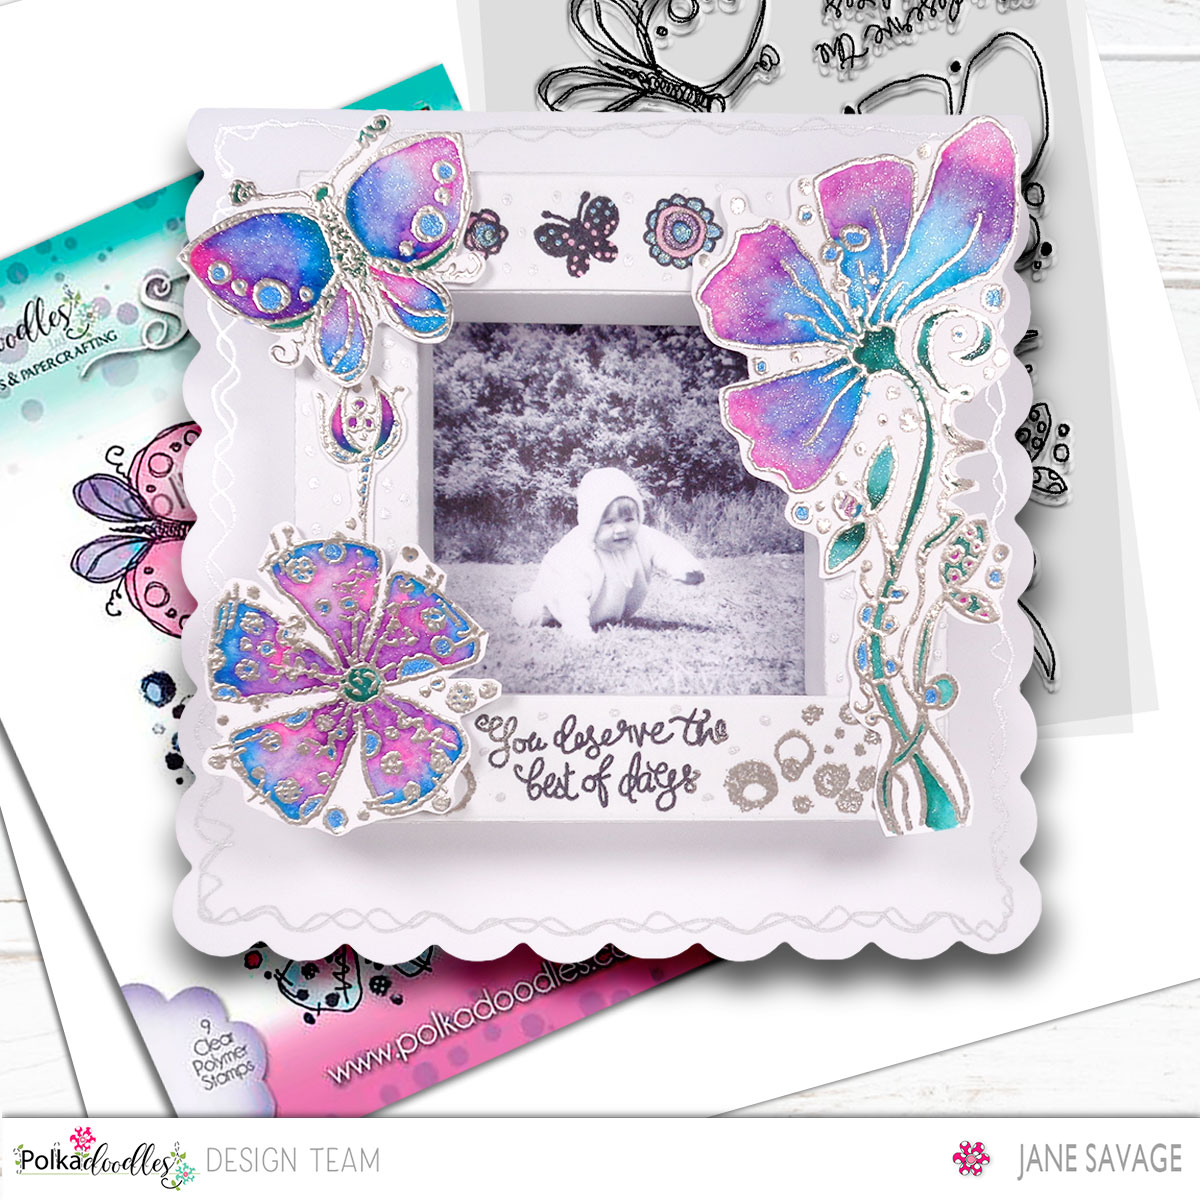
 Jane – Hello everyone! I have used the fabulous BEST OF DAYS FLORALS stamp set on my project today, a box frame card with a picture of me at 14 months old. I haven’t changed a bit.

Sonia Goodliff - I created a journal page using  the lovely Home-Grown Stamps and the Sweet-Smile Stamp sets
Claire P - Hello! I created this card using the Stamps called Weirdre Angel Wings 

Ariadna - Hello crafters!! I`m so excited to show you my first project as a DT member of @polkadoodles.   I made a slim card using one of its beautiful digital stamps, the Hooray-Sparkle Unicorn. I fell in love with this unicorn!. I used my favorite colour pencils to paint it and some inks for the background and a little twist of my personal touch drawing the sun, the clouds and the grass.  Hope you like it!

Paul Hassall - I created this card with lots of texture using a stencils and the Friendship Days stamp collection...
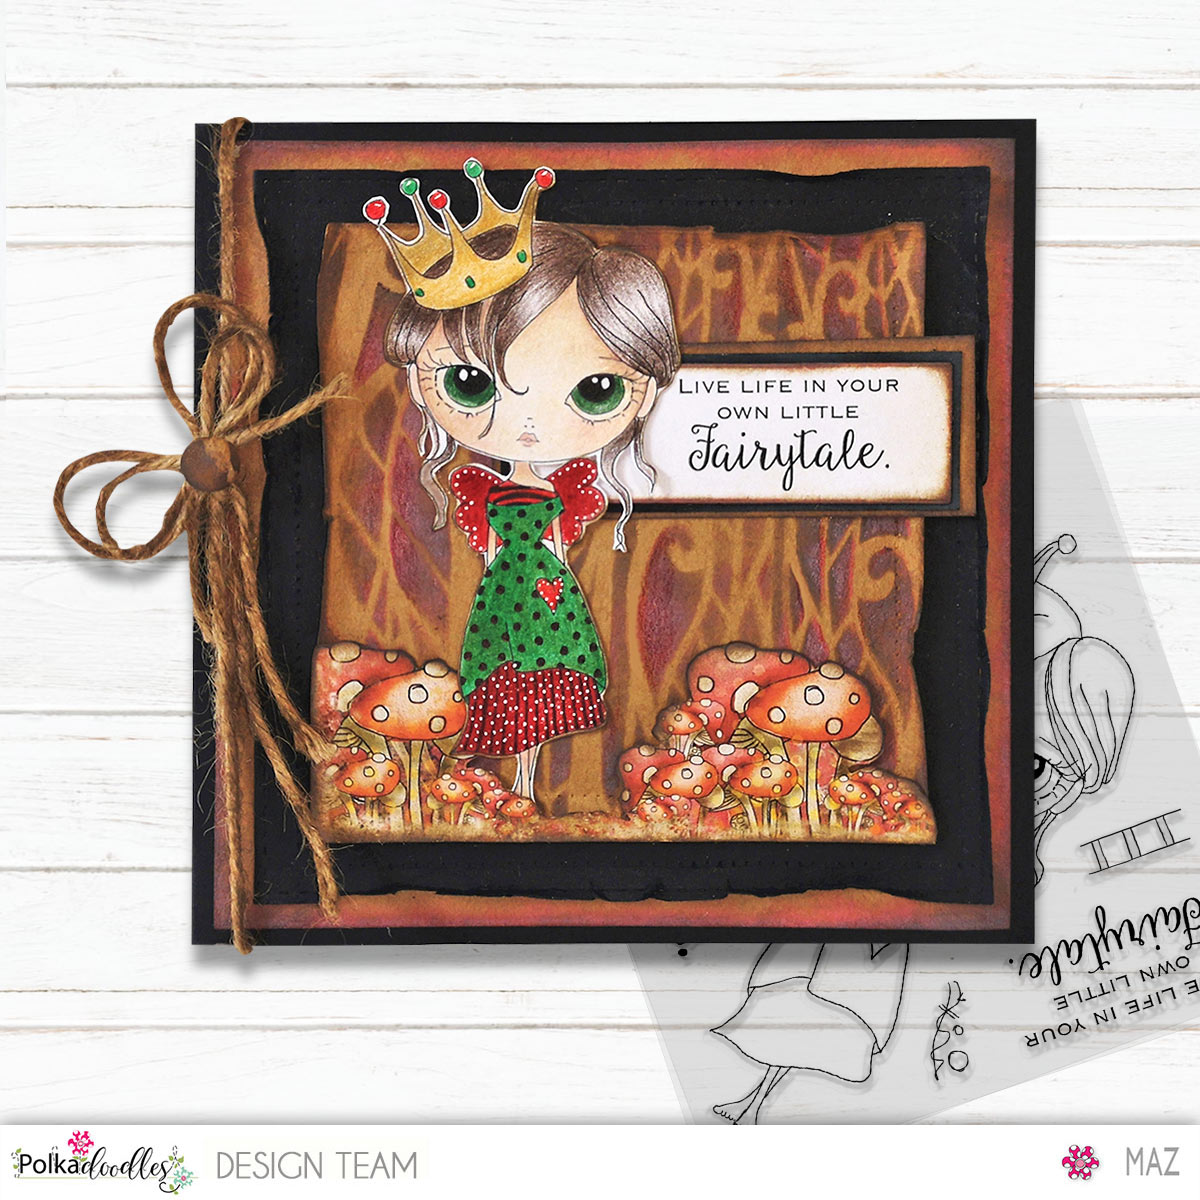
Maz - For my project today, I used Ula, Be a Princess and coloured using Prismacolor pencils. I created the background using Leafy Forest Stencil. The little toadstools I cut out from Winnie Wonderland Paper Heaven 4. More details on my blog.
Natalia - Hi everyone! I've prepared for this week just a simple mixed media card. I made my background based on watercolour paints and stamps from Bella Fleur A5 large Clear Stamp Set. I added some splashes and doodles. I wish you a creative weekend!

Nikky - I'm sharing this decorated journal cover using the new Blooming Blossoms stamps and this gorgeous Ula Stamp called Beautiful...You can find full instructions to make this over on the Polkadoodles Blog here


Wow! Amazing projects and creativity from the team this week!


WINNERS FROM CHALLENGE 6
Thank you everyone who entered this challenge - we really loved looking round your blogs, you all left us some awesome work to look at and there were so many great projects it was SO hard to choose our winners this week!

RANDOM $10 WINNER IS...


Well done!
PRIZE: $10 gift voucher to the Polkadoodles Store to spend on anything you like including mixed media goodies, stamps, papers & anything else!....

To claim your prize please email Polkadoodles, quoting 'Love 2 Create winner'.
Please include this claim code L2CWK06001 in your email and claim by 2 July.
Allow 14 working days for a reply please.

DESIGN TEAM TOP 3 FAVOURITES - WINNING A DIGITAL STAMP, ARE:


Congratulations - the team loved your work!
To claim your prize please email Polkadoodles, quoting 'Love 2 Create winner'.
Please include this claim code L2CWK06123 in your email and claim by 2 July.
Allow 14 working days for a reply please.

Don't Forget to enter our other blogs too...
All our challenges are Anything Goes!........Find us here:

You are invited to the Inlinkz link party!

Click here to enter

Sunday, 25 February 2018

Guest Designer for February - Introducing Kym Upshaw

 Happy Sunday everyone and welcome back!

Again at Love 2 Create Challenges we are extremely proud when other crafters agree to be featured as a GDT on our blog and today we are sharing a project from Guest Designer Kym Upshaw. You can check out Kym's fabulous work over on her blog - Kym's Crafty Cards

Here's a short bio about Kym ...


My name is Kym and my blog is Kym’s Crafty Cards. I have been married to my husband for 26 years. I am a mother to two boys aged 25 and 21. I started cardmaking about 10 years ago and the cards that I make I sell solely to raise funds for different charities.  I love to use decoupage, toppers, rubber stamps but my first love has to be using digital stamps as you can print them any size that you want. I love to work with many different styles of rubber stamps/digital stamps eg cute, vintage, fantasy, Christmas etc and will have a try with any image to make some wonderful cards/creations so that I can sell to raise funds for charities.

Here is the fabulous card Kym created for us using Polkadoodles 'Ula - Be a Mermaid' ...


After being offered my GDT slot, I was lucky to be allowed to create with a Polkadoodles image and I chose to use "Ula be a Mermaid". I have coloured the image in with Promarkers and fussy cut around the image. I also printed off a sentiment that I got with the image, die-cut and edged with my Turquoise Pan Pastel.

For the background I used a Turquoise, Diarylide Yellow, Hansa Yellow and Pearlescent Yellow Pan Pastels to colour the background. I then used various seaside orientated stamps (greenery, driftwood, bubbles and fish) and stamped these onto the background.

I then used a Marianne designs die to make the mount for Ula the mermaid. I have finished the card off with some die-cut greenery and a die-cut shell border and individual die-cut shells highlighted with the the Pan Pastels used for the background and two large pearls.


Here is a list of the products I have used to create my card :-

Promarkers used: Face/skin - Saffron, Spice and Oatmeal
                             Hair - Yellow, Canary and Lemon
                             Mermaid/shells etc- Duck Egg, Turquoise, Putty, Tan, Burnt Orange & Dusky Pink.

Pan Pastels used: Rich Gold
                            Diarylide Yellow
                            Turquoise
                            Copper Metallic
                            Hansa Yellow
                            Pearlescent Yellow.

It's a honour to be a Guest Designer as I have followed the Love to Create for quite a few years now and participated in lots of the challenges..


* * * * * * *

Thank you Kym for your fabulous project and we look forward to seeing more of your projects in the future both here at Love 2 Create challenges and also on your blog.


Just a quick reminder to everyone that Challenge #5 ends tonight at midnight which means you still have a little time to add your project. All details for Challenge #5 can be found HERE.

Join us next week for another new challenge but until then ... happy crafting to you all ...,

Sunday, 11 February 2018

Love 2 Create - Nikky Hall using a digi image to create a journal page

We are very lucky today and have the very talented Nikky Hall (from Polkadoodles) sharing one her of her projects with us on Love 2 Create using a digi image called Oddella Twig to create a journal page ...

Over to you Nikky ...


I coloured this Oddella image up a few weeks back and when I looked at it the following day I suddenly had an overwhelming urge to make her into a journal page which I have not done for absolutely eons...and I mean eternity eons! So I didnt lose the mojo for her I rushed upstairs as soon as I got in from work and decided I was only allowing the time it took for the pizza to cook and no more - I'm trying to set myself time goals so I just go with the flow and didn't procrastinate too much as it's killing my melon, man ... this was the coloured image before and after ...


 I just got all my fave colours out and random stamps which just happened to be the nearest to hand which were all my textures from Premium Art Brands and threw it all on. I did actually spritz and seal between layers but because I was rushing they did get very muddied and I used a lot of yellow ochre pan pastel, (which I don't normally do). Not what I was aiming for at all but this was pizza journaling after all ...!


I just ripped the image off the paper and glued it down with photo glue then applied all the Pan Pastel colours around it, using a Versamark inkpad to overstamp - love using Versamark ink as they just stick to the Pan Pastels like glue and make it so vibrant...


A bit of doodling to finish off using a black Graph'It marker which will go over virtually anything and the must have Graph'It White Shake marker and voila ...


WOWsers, I'm sure you will all agree that that is one fabulous journal page and unless you were told, wouldn't believe that it was a digi image and not a stamped one.

We'd love it if you became a follower of our challenge blog, not just to join in with the challenges ... which would be way cool by the way ... but to check out all the fabulous projects shared.

Happy crafting everyone and don't forget to pop over next week as the winners, plus top 3 will be announced for last months challenge. REMEMBER you still have time to enter this months challenge and all the details can be found HERE.

Before we go, what have you been making recently? Why not pop over to our Facebook page and share your projects with us - https://www.facebook.com/groups/love2create - we look forward to seeing you.

Sunday, 10 December 2017

Awesome tutorial from Gemma!

Happy Sunday everyone and you are all in for a treat as we have a wonderful tutorial from gemma today. Before you whizz down to the tutorial, please remember that you have up to 31st December to enter this months challenge, (Challenge #3) - details HERE - and if you fancy being a GDT for Love 2 Create, add GDT after your name when entering your project.

Now over to Gemma ... 


I have a fun Christmas/winter canvas to share with you all today, I love making this kind of project, it is not too time-consuming and the process is fairly simple to recreate in lots of different sizes and on different bases.


 I printed out a few background sheets from the wonderful Polkadoodles Festive Christmas collection, Keeping in mind that I wanted papers for the sky and ground as well as different patterns on cardstock for the trees. 


Then I tore my sky papers into little squares and glued them to the canvas with a mat gel medium, I covered about two-thirds of the canvas, not worrying about the edges as I had already decided I was adding a painted frame. 
I tore the ground papers into stripes, giving then a curved shape and I glues them to the canvas in the same way.


Before cutting my printed card into triangles and some scrap card into rectangles for my trees, I went around all the edges of the papers that were glued down with my Pitt brush pens and blended the ink with my fingers. This helps to bring everything together and make it feel like one piece. 


After my trees were glued into place, I edged them with the same pens. At this point, I also stamped out and glued my chosen text onto the canvas and edged them as well.


I then took a lovely wintery themed stencil from my stash that reminds me of snow falling and applied texture paste through it onto the canvas. before the paste could dry I sprinkled glitter over the top.


Then I just needed to frame it and I did this by adding brown paint to texture paste, I applied it to the canvas with a palette knife, which gave me the effect of a very rustic bumpy imperfect frame.


I hope you enjoyed my tutorial, there is still plenty of time to join in this months challenge. We love seeing what everyone is making.

Gemma


Sunday, 12 November 2017

A Fab Tutorial by Terry

Happy Sunday everyone and boy oh boy do we have a treat for you today ... a stunning tutorial from Terry who uses a digi image to create a mixed media project. Terry's full tutorial is below.

Our monthly "anything mixed media/creative goes" challenge is still running and we'd love it if you could play along. The link to the challenge is HERE.

Now over to Terry ......

* * * * * * * * *

It is my turn, Terry to put a tutorial together for your inspiration and I just loved doing this for you all.


I colored the ULA Image from Polkadoodles, with my copic markers.....I love coloring and this amazing cute girl was a lot of fun to color.


What I did was I cut a piece of paper that I wanted for my background, took different coloured Distress Ink and splashed some water on top to let it flow over the paper. The best way to do that is to hold the paper between 2 fingers and then spray the water. You can rotate the paper so that water goes over it. That way you get a mix of colors on your background.


After the background paper is dry, I have added some color. Also, the brown color along the edges of the paper and a bit of green.


Then of course I wanted to be sure that the background colors would fit with Ula....and I thought she did fit in perfectly.

I thought the background was a bit bland, so I used a stencil to fill the background. The Grit Paste gives the flower a 3D-effect and takes in the color from the Distress inks.


When the Paste was dry I got my waterpen, the fabulous stampset from Polkadoodles, calles Bonfleur and stamped 2 butterflies from the stampset. I colored the butterflies with the Distress Oxide and cut them out of the paper. The background was colored with the Oxides too. This time I used the Distress Inks but you can easliy work with the PanPastels too. They work great on the background and also to color your Digi stamps and Stamps.


Working with the Paste gives the flowers a real 3D effect. Still thought the background was a bit bland so I stamped a few tiny flowers on the paper. I colored the tiny ones with distress too and I was happy with the result. 


A bit upclose so you can see what I mean with the flowers having a 3D effect with the Paste. 


Oke so my background is finished with the fab colors and the stencilled flowers. Now all I need is the colored image from Ula, so I decided to get some doublesided tape on it and placed the image on my background paper.


So what do ya all think, I am pretty happy about it, and if you tell me Mixed Mediums don't mix with digi images, you'r totally wrong eh? All it needed was a few words...I thought Sending Lots of Love would be just perfect....and to finish I have placed the colored butterflies on the flower and on top of the card and my card is finished. 


So there ya go, my project that I wanted to share with you for your inspiration is finished. I sure hope you are going to get your thinking cap on and get those fabulous digi stamps from Nikky, from Polkadoodles...I am sure you are going to love these cuties.....

Thank you all for stopping by and hope I gave you some ideas on what you can make with Mixed Mediums and Digistamps mixed with stamps.
Have Fun.

* * * * * * * * *

A huge thanks Terry and next week, our inspirational post is from another ubber talent crafter, Zeljka Jurkovic-Grizic.

Don't forget you still have time to enter our November monthly challenge and you can find all the details HERE.

Sunday, 5 November 2017

Challenge 2 - Anything Mixed Media/Creative Goes

Good morning, November is here already so it's time for a new challenge!! A big thank you to everyone who entered last month's challenge, the DT will be voting for their top 3 picks and we'll be announcing the winner and Top 3 on  November 26th. The long winter evenings are a great excuse to craft so I hope you're going to join us. Our theme is easy peasy ...

Anything Creative Mixed Media Goes

You don't have to use our products to enter (but we do a happy dance when you do lol) and the challenge will run until 30th November so there's loads of time to play long. Did I mention we've got a fabulous prize from Polkadoodles for our lucky winner too?

Polkadoodles Ltd
Prize: £5 gift voucher for the Polkadoodles store.


So check out the inspiration from our DT and get crafting to be in with a chance of winning! As you can see our talented teamies have been busy working their mixed media magic for you .....

Claire C I've made a mixed media wallhanging using the beautiful new image called Nature Lover - January which you can find in the Polkadoodles store here. I've printed her onto kraft card and coloured her with pencils. The background was made with PanPastels. Next I stencilled some leaves with iridescent paste and once it was dry added some colour with alcohol markers. You can find all the details on my blog


Gemma I have a poster to share with you all today made using printouts from the wonderful Belle Papillon collection from Polkadoodles. I ripped and glued printable background papers onto mixed media strength card with Gesso. Once dry I layered up acrylic and water sprays, before adding some stencilling with Pan Pastels. Then I glued these wonderful large butterflies from another printable into place with a feel-good quote, once dry I added some colour with more Pan Pastel and colouring pencils to blend them in before going around the edges with a black pen.


Lou: Last week I shared a 'top tip' about different media to print on to create your mixed media projects - see HERE - and this week I am sharing with you the project I made using my printed toilet roll and kitchen towel. I have used the Belle Papillion Big Kahuna collection to make a notebook cover. I even dusted off my Bind It All to make the notebook! You can find lots more details and photos over on my blog.


A Sneeky Peeky this time from me (Terry) on the 19th of November I will be sharing a Tutorial on how I made my project....hope to see you there....xxxx


*******************************************************
We don't really do loads of rules here but we do have a couple so please take note:
1. No back links
2. Only 2 entries to make it fair for everyone
3. The main prize must be claimed within 10 days or it will be offered to a random winner from the Top 3 from the same week.
4. You MUST be a follower of this blog to enter.

The challenge will run until 30th November and the winner and top 3 will be announced on Sunday 24th December 2017!!

Add your link below to be in with a chance of being our lucky winner or Top 3 honours.
Good luck everyone!!

Do you fancy a GDT spot at Love 2 Create? 
If so, please put GDT after your name and we'll contact you.


Mister Linky's Magical Widgets -- Thumb-Linky widget will appear right here!
This preview will disappear when the widget is displayed on your site.
If this widget does not appear, click here to display it.

Sunday, 8 October 2017

Welcome our Guest Designer Angie!

Good morning crafty friends!! We're so excited as today's the day we meet the first of our lovely Guest Designers and today we're welcoming the lovely Angie Jones!! Before we check out Angie's beautiful project, just a little reminder that you still have plenty of time to enter our challenge and be in with a chance of winning these gorgeous goodies from Polkadoodles ...

 
It's sooooooo easy to enter, you can use any products to play along and the theme is

Anything Creative/Mixed Media Goes

Just click here  and scroll down to add your entry to the linky!!!

Now let's have a peek at Angie's awesome project:

No automatic alt text available.

Anjie has created a canvas and used Ula's Life Don't Listen black & white and the sentiment from Ula's Life Be Strong. 

Isn't it gorgeous, love love love that background Angie!! Check out Angie's blog here for all the details

Let's meet the lovely lady herself ....

Image may contain: 1 person, smiling, glasses and close-up

Angie Jones - I live in Queensland, Australia. 
I have always loved colouring in since I can remember....my stamping / card making started around 30 years ago.....I bought some copic markers at a craft show about 3 years ago and sort of yes. no for a year. Around 18 months ago, I did a few online classes and bam.....whole collection of markers now and I colour everyday! I have added paints / stencils and stamps to create gorgeous backgrounds. So my Mixed Media is just developing but I am loving the journey.

Thanks so much for sharing your beautiful artwork with us Angie!

If you'd like to see more of Ula's Life, the collection Angie has used you can find it here. It's full of beautiful papers, sentiments, digistamps (black and white plus precoloured), and a selection of cutting files to make your own stencils too!!

Ula's Life SPECIAL EDITION (mini CD rom) - Digi Droplets craft digi CD

We'll be back next week with another fabulous guest designer so make sure you pop back then and don't forget to add your entry to this month's challenge ....

Just click here  and scroll down to add your entry to the linky!!!